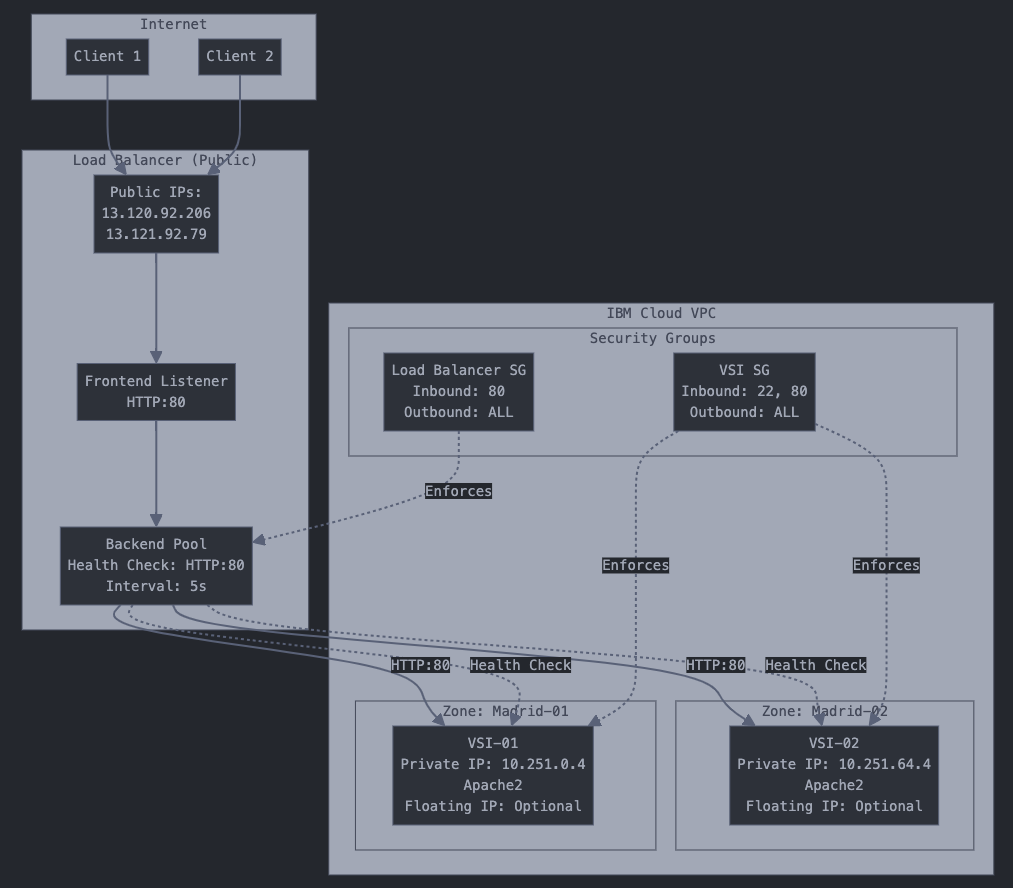
Load balancing is a critical component in modern cloud architectures, enabling high availability, fault tolerance, and optimal resource utilization. This guide focuses on implementing a load balancer solution in IBM Cloud VPC (Virtual Private Cloud) using two Virtual Server Instances (VSIs) distributed across different zones in Madrid.
Use Cases
- Web applications requiring high availability
- Applications with varying traffic loads
- Services requiring fault tolerance
- Systems needing geographical distribution
Architecture Overview
A comprehensive guide for setting up and troubleshooting a load balancer with multiple VSIs on IBM Cloud VPC.

Prerequisites
- IBM Cloud Account
- VPC created
- SSH key pair
- Basic knowledge of Linux commands
Step 1: Create Virtual Server Instances (VSIs)
(1) Create first VSI:
# Madrid-01 Zone
Name: vsi-madrid-01
Zone: madrid-01
Profile: bx2-2x8
Image: Ubuntu 22.04
(2) Create second VSI:
# Madrid-02 Zone
Name: vsi-madrid-02
Zone: madrid-02
Profile: bx2-2x8
Image: Ubuntu 22.04
Step 2: Install and Configure Web Servers
SSH into each VSI and set up the web servers:
# SSH into VSI
ssh -i <private-key> root@<floating-ip>

# Install Apache2
sudo apt update
sudo apt install apache2 -y

# On VSI-01
echo "<h1>Server 1 - Madrid-01</h1>" | sudo tee /var/www/html/index.html

# On VSI-02
echo "<h1>Server 2 - Madrid-02</h1>" | sudo tee /var/www/html/index.html
Step 3: Create Load Balancer
Configure the load balancer with these settings:
# Basic Settings
Name: mad-load-balancer
Type: Application Load Balancer
Subnets: Select both Madrid-01 and Madrid-02

# Backend Pool Configuration
Name: madrid-vsi-apache2
Protocol: HTTP
Method: Round robin
Health check path: /
Health check port: 80
Health check interval: 5s

# Frontend Listener
Protocol: HTTP
Port: 80
Step 4: Configure Security Groups
Set up security groups to control access:
# Security Group Configuration
Name: lb-security-group

# Inbound Rules
Rule 1 - SSH:
- Protocol: TCP
- Port: 22
- Source: Your IP

Rule 2 - HTTP:
- Protocol: TCP
- Port: 80
- Source: 0.0.0.0/0

# Outbound Rules
Allow all outbound traffic:
- Protocol: ALL
- Destination: 0.0.0.0/0
Testing and Verification
Test your load balancer setup:
# Basic connectivity test
curl http://<load-balancer-ip>

# Multiple requests test
for i in {1..10}; do curl -s http://<load-balancer-ip>; done

# Load testing with Apache Benchmark
ab -n 1000 -c 10 http://<load-balancer-ip>/
Troubleshooting
Common issues and their solutions:
# Check Apache status
sudo systemctl status apache2

# Verify port listening
sudo ss -tulnp | grep apache

# Check logs
sudo tail -f /var/log/apache2/access.log
sudo tail -f /var/log/apache2/error.log
Best Practices
-
Security:
- Keep security groups minimal
- Regularly update systems
- Monitor access logs
-
Performance:
- Configure appropriate health checks
- Monitor backend pool status
- Set proper timeout values
-
Maintenance:
- Regular backup of configurations
- Document all changes
- Keep monitoring active
What is Round Robin Load Balancing?
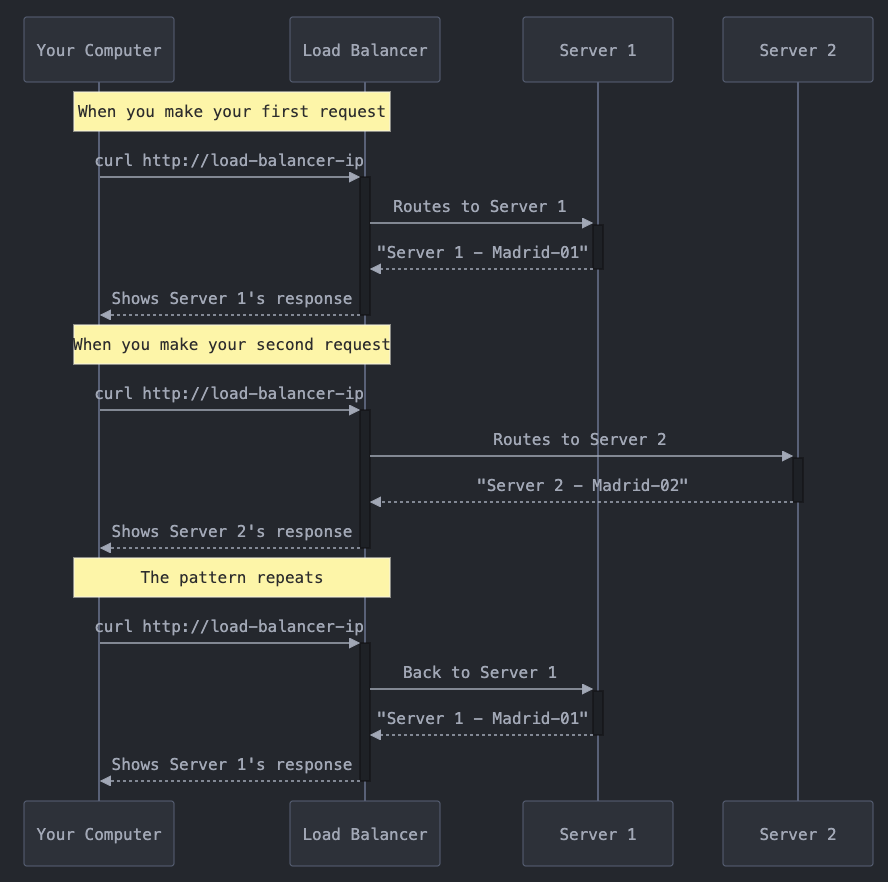
Round robin load balancing distributes incoming network traffic across multiple servers in a circular sequence, with each new request being assigned to the next server in line. When the last server is reached, the system cycles back to the first one, ensuring an even distribution of load across the server pool.
Here's a simple example:

# Run this to see the alternating pattern
for i in {1..6}; do
    echo "Request $i:"
    curl -s http://load-balancer-ip
    echo "----------------"
    sleep 1
done